Chinese Pro Co Rat

Pro Co Rat 3 broken

Customers often ask why there is a $25 additional fee for the Chinese made Pro Co Rat 2 (technically Rat 3) and how to identify if their model will be subject to this fee. This is an issue that has been come up a few times over the years so I’ll show why the build quality of the new Rat pedals causes us to charge more.

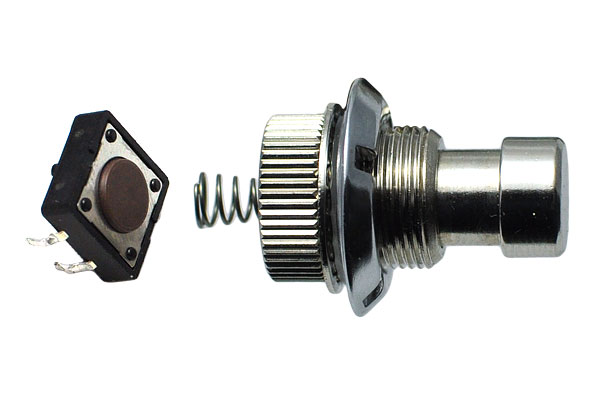
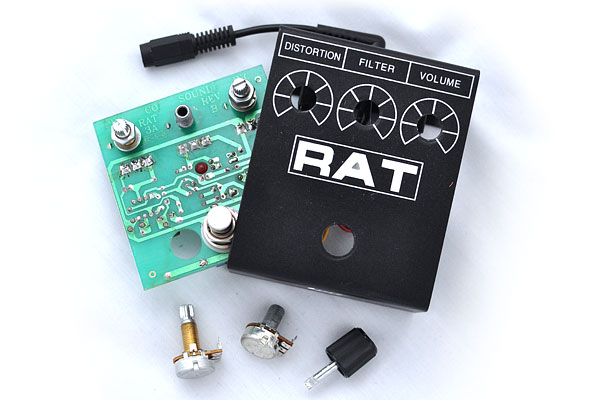
Let’s start with the basics: To remove the knobs on most pedals you simply pull the knobs off. When doing this on the newest Rat pedals the entire shaft rips out and the potentiometer then needs to be replaced. If you look above you can see the knob with the shaft stuck in it on the right. The brass-threaded potentiometer on the left is a high quality replacement that we use if the pots are in fact broken in the process.

While I’m not familiar with Pro Co’s pedal production timeline it appears that the consensus is that the problem pedals are:

  • Likely made after 2009
  • Made in China
  • Have smaller, 16mm potentiometers instead of the traditional 24mm.
  • Serial number above 300,000
  • Knobs look different than the classic rat knobs with the knurled edges

If you aren’t sure please remove the back of your pedal and take a photo of the circuit board before mailing the pedal in.

Posted in Gear Related | Leave a comment

Custom Scalpel

scalpel custom momentary

The Scalpel is a passive volume pedal which allows you to quickly cut the volume of your instrument to a specific level without needing to play around with a large volume pedal or using your hands to adjust the volume knob on your instrument. It also happens to be the most commonly modded pedal that we make.

This custom Scalpel has two key differences from our base model (which can be purchased through our online store). Since this is being used with bass we decided to install a toggle switch to bypass the treble bleed circuit. This circuit was designed to prevent a guitar from sounding dull when turning down the volume by bleeding through some treble. We’ve used this for years on guitar with excellent results but without having time to experiment fully with a bass we went with a toggle switch option. The other change we made was to add a momentary switch to quickly bypass the pedal for short bursts at full volume.

Check out our main page (in the links above) for contact info on custom mods and view the gallery for some of our other custom creations.

Posted in Uncategorized | Leave a comment

Electro Harmonix Hog’s Foot Modernization

hog's foot


Electro Harmonix has a wide variety of old pedals that sound awesome and totally unique but they lack some of the modern features that modern musicians have come to expect. The Hog’s Foot is a unique pedal because it cranks the bass and cuts the treble as opposed to most modern boost pedals which either sound neutral or boost the treble to overdrive an amp.

Some annoyances of these old pedals include a terrible sounding bypass, lack of external power supply (and no battery door at the least!), no status LED, and the battery doesn’t even disconnect when the input plug is removed. In the process of updating this pedal we removed the battery on/off switch and wired up a new input jack to switch the battery off when unplugged the way almost every pedal in the past 40 years has done it. A “Boss style” 2.1mm barrel jack was added for power options as well. The pedal was converted to true bypass and had a red LED installed next to the switch.

Now that the power switch is no longer in use it would have been a shame to leave it without any purpose. The solution we came up with was to allow it to switch from a bass boost to a lower mid / bass boost. This adds a bit more low-mids for punch and helps the pedal cut through the mix if needed. The updates along with a new switch and jack should help the pedal feel at home on any modern pedalboard.

hog's foot inside

Posted in Uncategorized | Leave a comment

Eventide Time Factor: switch upgrade

Eventide Time Factor switch upgrade


There’s a long history of pedal manufacturers using PCB mounted switches and a spring actuator. This system is very cost effective for manufacturers but leads to problems in reliability as the switches are often cheap and unreliable. Some other pedals with a similar switching scheme include the Line 6 modeler series pedals and the newer TC Electronics pedals such as the Flashback X4. What we do is replace the spring actuator (as shown below) with a standard “soft touch” switch which is a favorite of many musicians these days. This mod works on most pedals that have room for the new, larger, and more durable switch and will withstand the rigors of the road.

spring switch

Posted in Modifications | Leave a comment

Digitech Whammy 5 control box

whammy-V-remote-control

The Digitech Whammy has been around forever and the latest revision– while very nice– still doesn’t address the issue of not being able to change presets without leaning over and turning the knob. While some guitarists choose to use a MIDI box to make changes our solution has always been to install a second footswitch so you can cycle through the presets. This was a great hands-free solution but may be tedious for quick changes in the middle of a song.

The box above allows you to remotely control the Whammy and uses the same rotary control as the stock pedal. This box can be mounted on a mic stand or left on a table for easy access. We also offer LED color swaps so you can quickly identify your favorite settings from a distance.

Posted in Custom Shop, Modifications | Leave a comment

MXR CSP-001 Variphase: What were they thinking?

variphase modded


We are often asked to rehouse pedals into wah casings so the effect can be manipulated while still playing guitar. This ends up being a very expensive rehousing due to the cost of the casing as well as a variety of other adjustments that need to be made in order to get the new housing to accept a circuit not designed to fit in it. When MXR released the CSP-001 Variphase there was much anticipation until the reviews came in and many of the flaws were pointed out.

First, the pedal is spring loaded so the pedal automatically returns to the heel-down (or toe-up) position. This means that you cannot set the pedal to the desired rate and then take your foot off of the pedal; You’re constantly fighting with this spring. The first thing we did in this project was remove the spring mechanism (below: left) and install a normal wah torsion block (below: right).

variphase-torsion-block


From here we installed a normal stomp switch as you would see on a regular wah pedal which you activate by pressing your toe down. The new switch is true bypass and we even installed a pulsing LED so you can see the rate which the phaser is set to.

The second problem with the CSP-001 is that the circuit was modified from the traditional Phase 90 in an attempt to improve it. While a different circuit doesn’t have to be a bad thing– the massive volume boost when activated is definitely not welcome. This pedal has a volume knob on the side and even at the lowest setting there is a massive increase in volume when activated. With the modifications that the customer requested it ended up being cheaper to just replace the whole CSP-001 circuit board with a 74′ reissue Phase 90 and start from scratch.

variphase inside

Some added modifications include knobs to adjust the maximum speed, mix, and intensity as well as a Phase 45/90 switch, upgraded jacks, and true bypass with a pulsing LED. More info about the modifications for the Phase 90 can be found on the FXdoctor Phase 90 page.

And for those of you wondering why the LED is off-centered: the placement allows you to see the rate while keeping your foot on the pedal.

variphase LED placement

Posted in Custom Shop, Rehousings | Tagged , , | Leave a comment

MXR Analog Flanger M117 power conversion

mxr 117 flanger vintage

Whenever I talk about modernizing pedals that refers to maintaining and improving vintage pedals without changing their tone. Sometimes this involves converting the pedal to true bypass, adding a status LED, replacing old and aging components like electrolytic capacitors, and in this case: converting the pedal to run on a standard power supply / pedal power unit.

This may sound confusing to some people. Why doesn’t changing the power supply change the tone? In this example, the MXR 117 uses a 15V regulator. That means it will take a higher voltage and always outputs 15V to power the audio circuit. Our modification removes the internal transformer and power cable and inserts a jack in its place to allow you to power the pedal from an 18V power supply. This is also a great option for pedals where the internal transformer has failed. Removing the internal transformer also allows this pedal to be rehoused, but that’s a post for another day.

mxr 117 pcb inside flanger

Posted in Modifications | Leave a comment

Chrome Tax: King Vox Wah vs. Thomas Organ Crybaby

The King Vox Wah and the Cry Baby from the 1970s were both made by the Thomas Organ Company. Both used the standard wah circuit that most manufacturers still use to this day. They were made on the same circuit board, 5117 transistors with a TDK 5103 inductor, used the same component values, and should sound identical.

king vox wah top

The only difference is that this King Vox Wah has an electrolytic capacitor where the Cry Baby has a tantalum of the same value. This is due to the fact that the circuit boards were manufactured a few years apart and would not change the tone in any way for this application.

Posted in Modifications | Leave a comment

Phase 90 circuit board revisions

Now I’ve seen hundreds of MXR Phase 90s over the years and by far the most common request is for info on the “Script mod.” I’m certainly not an MXR historian but what I can offer is a first hand account of repairing and modifying these pedals. Specifically we’ll be looking at the three oldest versions of the circuit boards and what the key differences are.

First up is the Script Logo Phase 90 which gets its name from the elaborate script font used on the casing. This is the holy grail of Phase 90s and has been in such high demand that MXR reissued the pedal made using the same circuit board as the original one seen below:

phase-90-script-logo

The most noticeable difference between this model and the future iterations is this one has six ICs all of which are single op-amps. This likely has little to do with tone and more to do with the availability and cost of ICs at the time. This model was released in 1974 and lasted until 1977.

In 1977 the Phase 90 transition into its Block Logo form which more or less was the same exact pedal except for one resistor. This resistor– which later became known as “R28″– gives a bit of a midrange boost and adds more resonance in the circuit. Below is a circuit board from 1979/1980 with an arrow highlighting the added feedback resistor.

phase-90-early-block-logo

A short time later MXR introduced an updated version of the Phase 90. This version has R28 mounted on the circuit board and also switch from six op-amps to three TL062 dual op-amps. Some other changes include minor value changes throughout the circuit, modified bias circuit for easier calibration, and pre-emphasis and de-emphasis capacitors. Below is a circuit board from the early 1980’s.

phase-90-late-block-logoMXR went bankrupt in 1984 and was later purchased by Jim Dunlop. The Phase 90 reissue (M-101) was a modern adaptation of the late block logo circuit with only minor changes to the circuit including better power filtering and using a single TL064 quad op-amp in place of two TL062 ICs. The reissues also have all board mounted components including the potentiometer, jacks, and switch. This makes for easy assembly by the factory but is more expensive to repair and not very good for reliability.

Currently Dunlop has more variations and signature models of the Phase 90 than I could keep track of but they all stem from these original designs (and can all be modified!).

Posted in Favorites, Gear Related | Leave a comment

Expression Pedals and the Phase 90

phase 90 exp rectangle


Adding an expression pedal jack to control the rate of an effect is a common request that we get for a variety of pedals. The Phase 90 is mentioned quite a bit but unfortunately it uses an uncommon potentiometer value which isn’t found in any expression pedals on the market. Our solution was to build a custom expression pedal from an old wah pedal. A few key features of this setup:

  • The slowest phaser rate (heel down) is set by the Speed knob on the Phase 90 itself.
  • The fastest phaser rate (toe down) is set by a Rate knob on the opposite side of the expression pedal.
  • The maximum rate can go even faster than when the pedal is in stock form.
  • Unplug the expression pedal and your Phase 90 is back to working like normal.

The only downside to a setup like this is the added cost of building a custom expression pedal. Our future builds will be using a Roland EV-5 expression pedal which is readily available, easily replaced in the event of failure, and is less expensive. Unfortunately the expression pedal jack occupies the battery compartment so this pedal requires an external power supply.

Posted in Custom Shop, Favorites, Modifications | Leave a comment